Windows 11 24H2 is now rolling out to the general public, but it may not show up right away when you check for updates. To download and install Windows 11 version 24H2 (Windows 11 2024 Update), head to Settings > Windows Update. You can also use the Media Creation Tool.
Windows 11 2024 Update has been available in the Insider channel for nearly a year and is now widely available for all users. It is the third version update for Windows 11, which debuted in 2021. Let’s discuss the multiple ways to download and install the 24H2 update on your PCs.
Where to install Windows 11 24H2?
The simplest method is using the Windows Update option on the Settings page. Here’s how to do it:
- Press the Win key, type check for update, and press Enter.
- Ensure that the Turn on Get the latest updates as soon as they’re available toggle is active. Recheck for updates again.
- If the update is available, click Download & Install. Reboot your PC after the page prompts you to do so.
As mentioned at the outset, Windows 11 24H2 is still rolling out, and it may not show up in all regions or on all devices. Microsoft calls it a “staged rollout”. Also, even if you get the update, since it is a version update, it could take a while to install on your PC and boot to the desktop.
In addition to Windows Update, Microsoft has also published ISO files for Windows 11 2024 Update.
Windows 11 24H2 system requirements
If you are wondering about the hardware requirements for Windows 11 24H2, they are pretty much the same, barring a few new changes.
Apart from the usual 1GHz dual-core CPU, 4 GB RAM, 64 GB Storage, UEFI, Secure Boot, and TPM 2.0, your processor must support the SSE4.2 instruction set with POPCNT.
It is a small change that wouldn’t affect most users because the processors that don’t support POPCNT are very old.
For the first time, the Windows 11 new version update, aka 24H2, packs some exclusive AI features for a new segment of PCs called Copilot+ PCs.
Their 24H2 version contains AI features that run locally using SLMs and can generate images, record everything that you do on your PC with Recall, and assist in many other ways.
Even if you don’t have a Copilot PC, the Windows 11 24H2 update will be available for you if your PC meets all the hardware requirements. Only the exclusive AI features (which need powerful hardware like NPU) won’t work on your Windows 11 24H2 PC.
Upgrade to Windows 11 24H2 from Installation Assistant
Another way to upgrade to 24H2 is via the Installation Assistant.
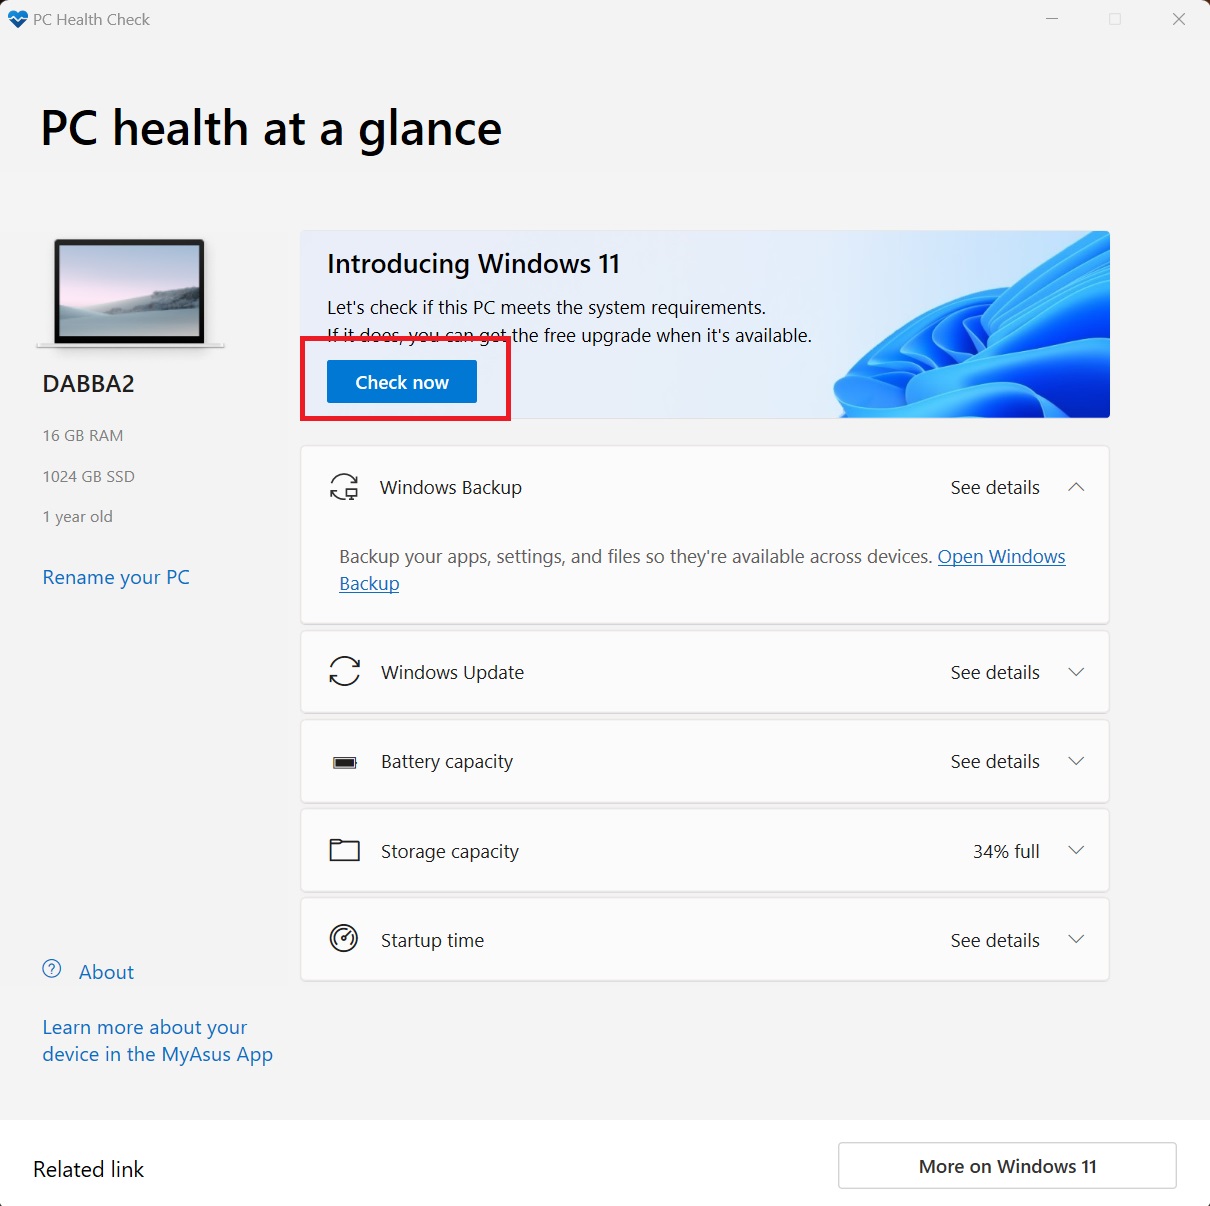
Before doing that, you can use the PC Health Check app to verify if your PC meets the minimum system requirements. Here’s how:
- Visit the Microsoft website to download and install the PC Health Check app.
- Once the app launches, click on Check Now. If all the checks are green, your PC is ready for Windows 11 24H2.
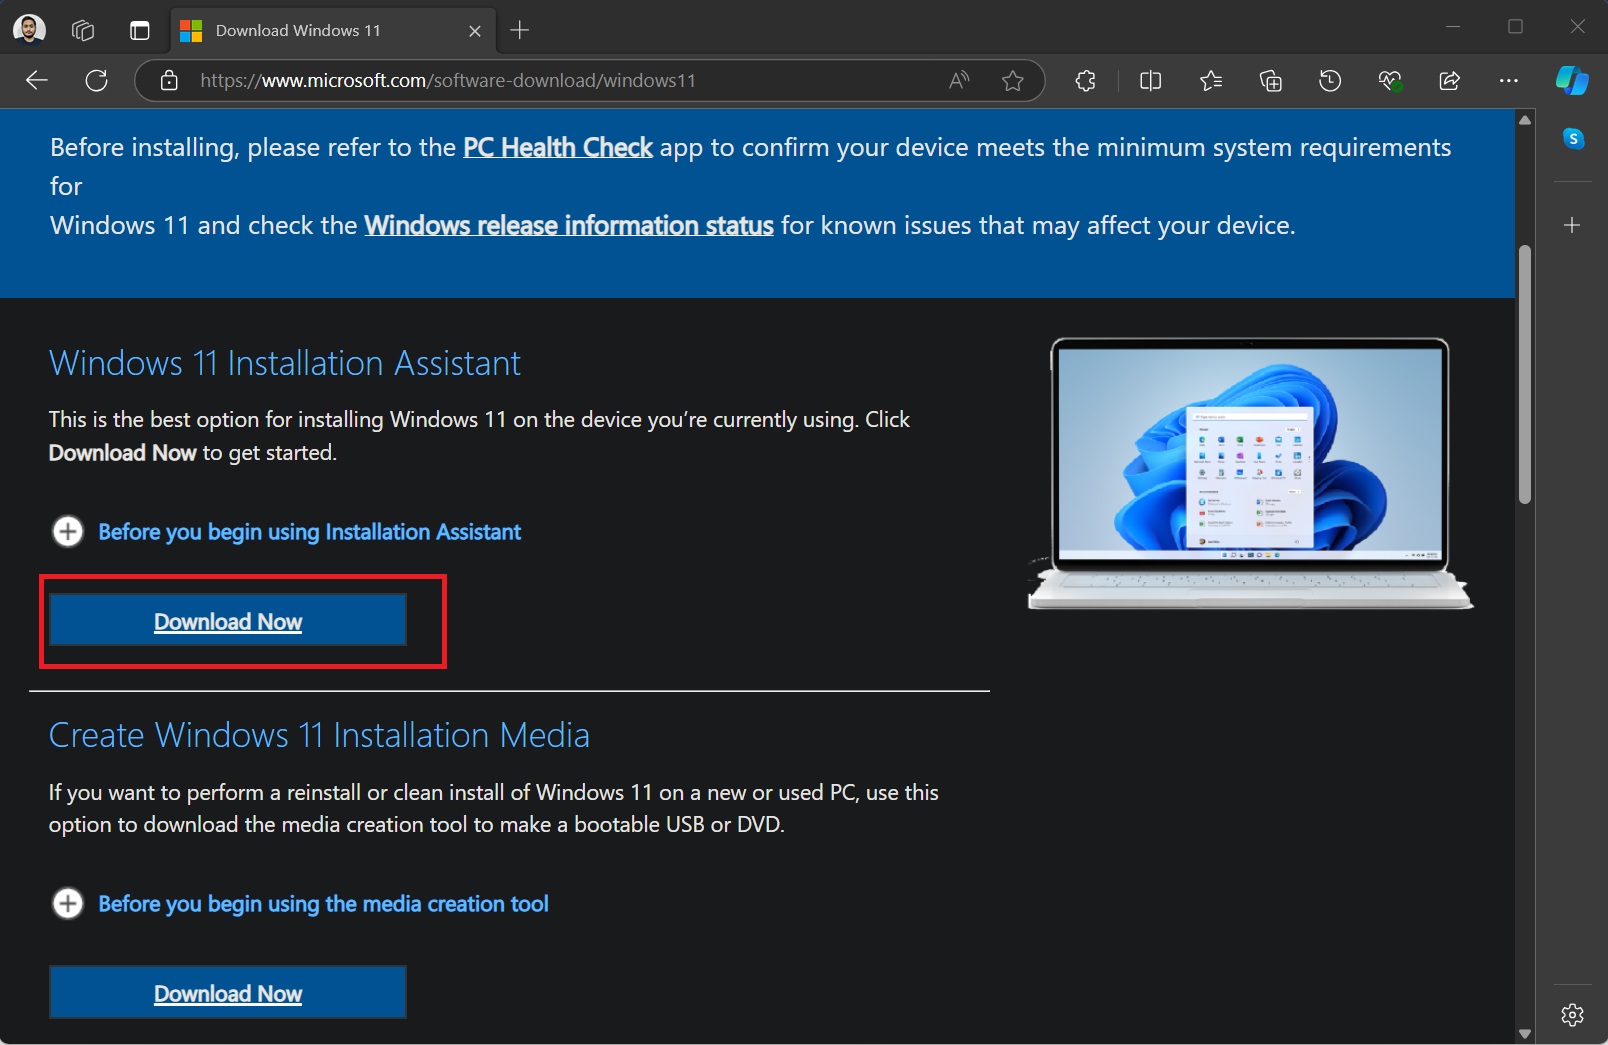
- Visit the official Windows 11 download page.
- Click on the Download Now button below the Windows 11 Installation Assistant section.

- Run the Windows11InstallationAssistant.exe file and wait for the checks to complete.
- Click on the Accept and install button to start the 24H2 update installation.
- Follow the on-screen steps and reboot the PC when the setup requests it.
- After the update installs, type the winver command in the Start menu and hit Enter to check the current version and build of 24H2 installed on your PC.
Upgrade to Windows 11 24H2 from the Media Creation Tool
Media Creation tool lets you create a bootable USB drive with the Windows 11 ISO file. Microsoft has replaced the direct download ISO file with the latest version (24H2).
So, you can create a bootable USB drive (use one with 8GB or more capacity) with the official tool. Here’s how:
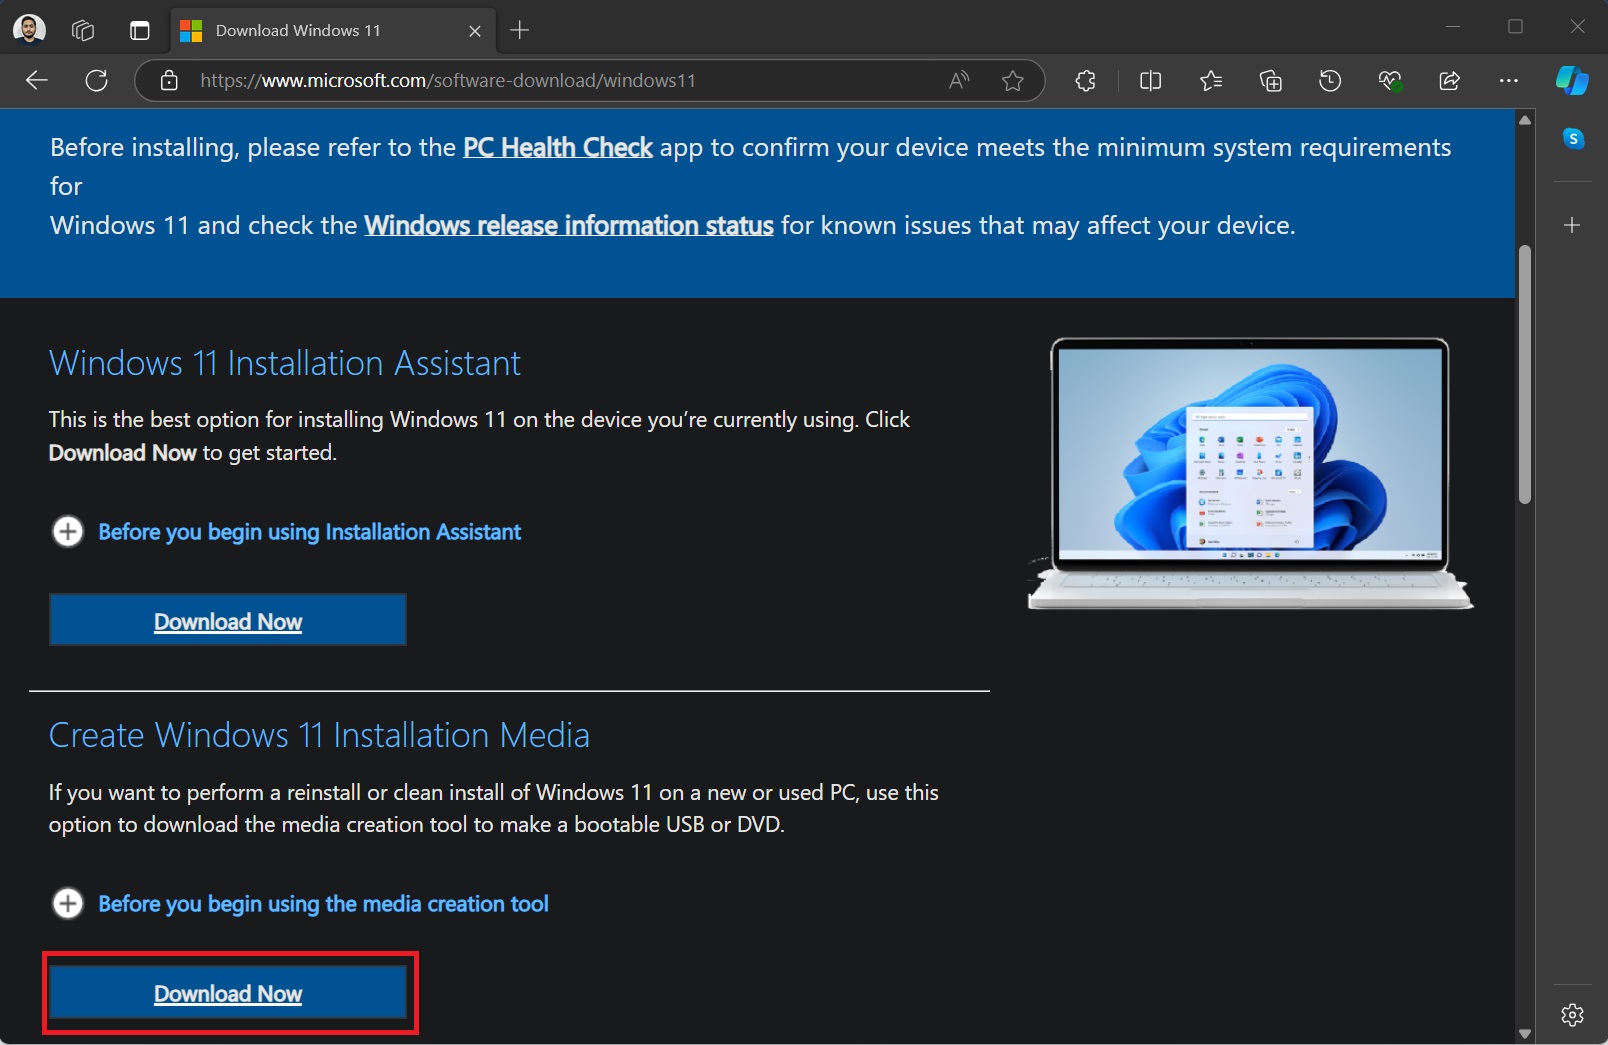
- Visit the official Windows 11 download page. Click on the Download now button below the Create Windows 11 Installation Media section.

- Run the Media creation tool and accept the EULA.
- After that, pick the USB flash drive option and follow the on-screen methods to create the bootable drive.
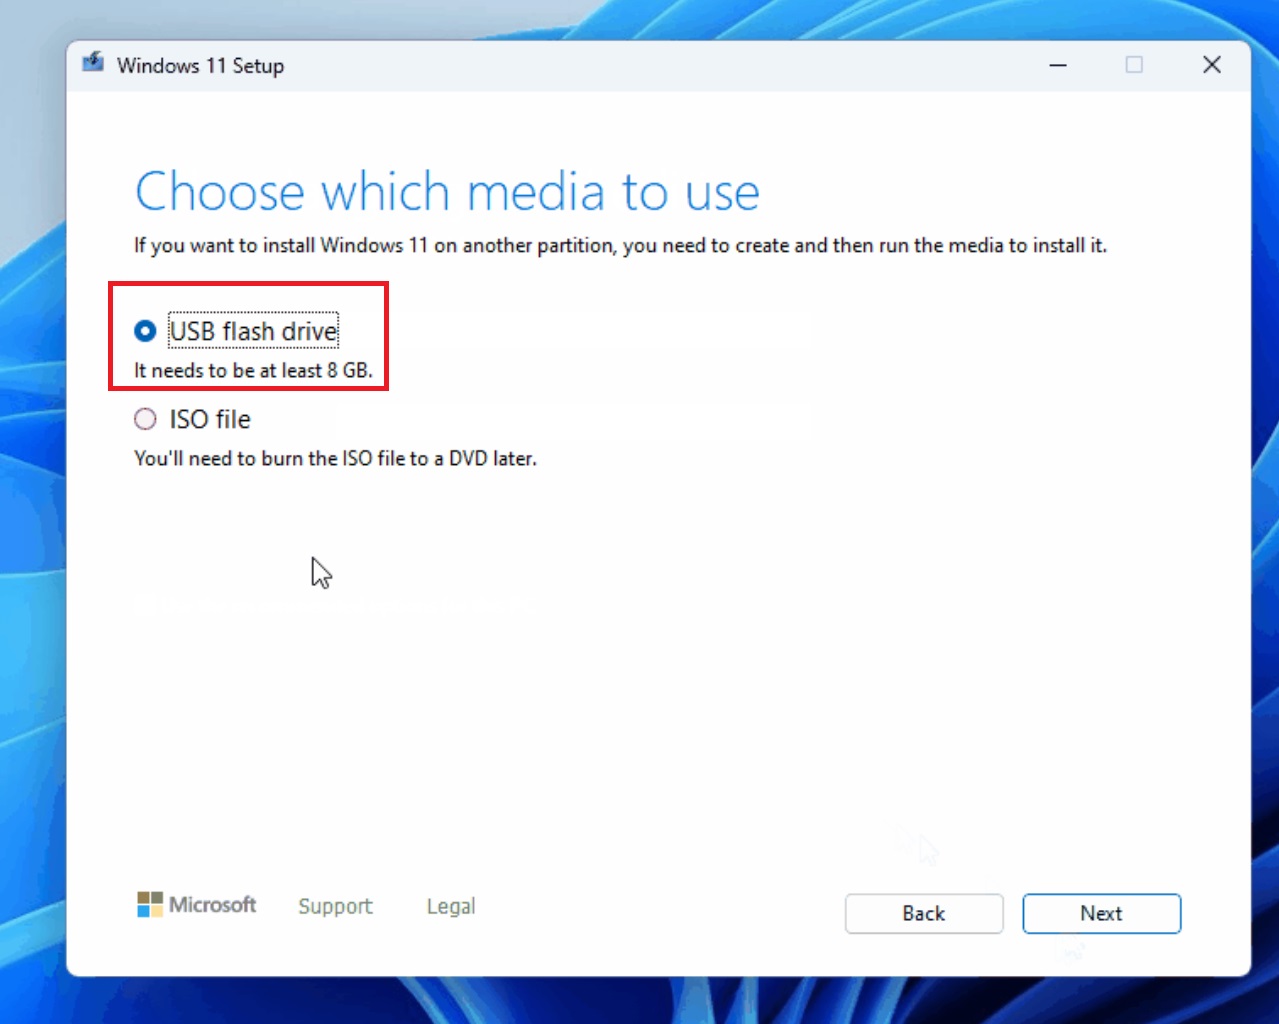

- Note that this involves downloading the 24H2 ISO file, which is more than 6GB. So, it will take a while to complete, especially on a slow connection.
- After that, restart your PC, select the bootable USB drive, and install Windows 11 24H2 version on your PC.
Clean Install Windows 11 24H2 with Rufus
If you want a fresh slate with Windows 11 24H2, you can use Rufus. It is reliable freeware to create bootable drives for Windows and many other operating systems. In this method, you’ll need two things: Windows 11 24H2 ISO file and Rufus.
Download both of them from the official links we have attached above. After that, plug in your USB drive and launch Rufus. Then repeat the following steps:
- Rufus will auto-detect the USB drive. Make sure you’ve selected the correct one.
- Click on the Select button. Find the 24H2 ISO file in the Downloads folder and click on OK.
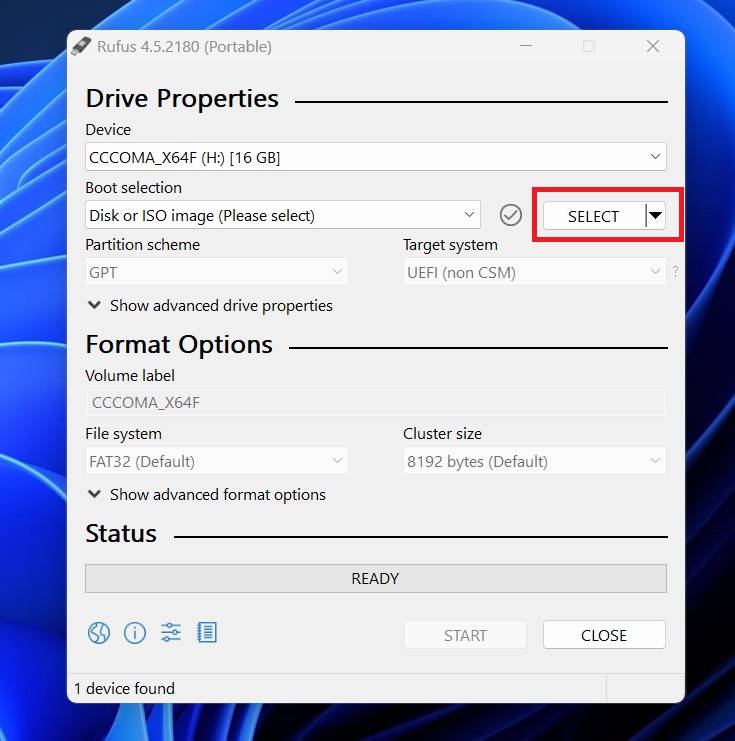

- Scroll down and click on Start.
- Leave all the options unchecked and click on OK.
- Rufus will generate a drive format warning. Click on OK.
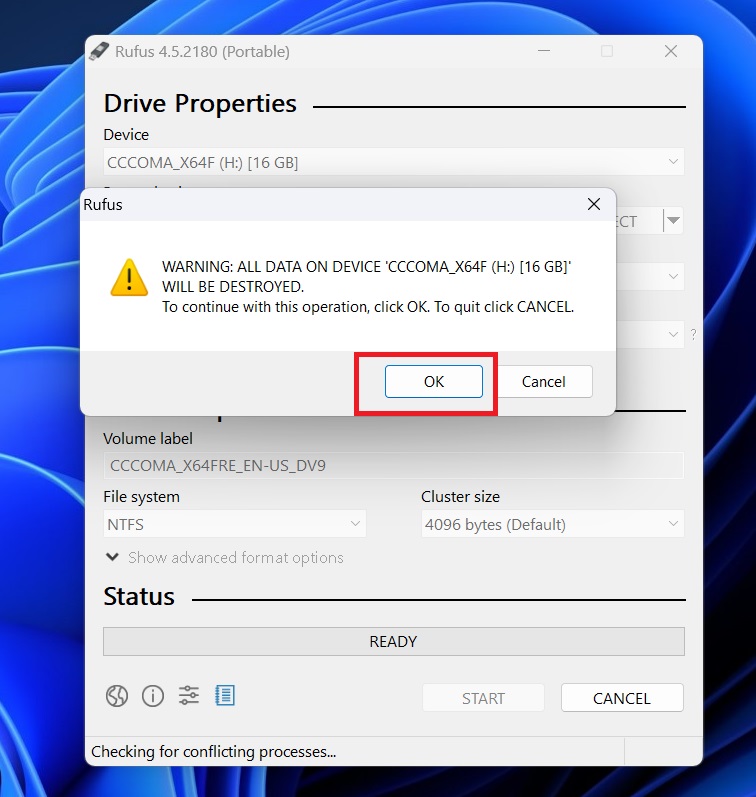

- After you see a Ready message in the Rufus window, close the app.
- Restart your PC and then enter the boot manager.
- Select the USB drive and then clean install Windows 11 24H2 on your PC.
Windows 11 24H2 brings forth a lot of changes that Windows Latest previously discussed in several blog posts. Here are a few noticeable ones:
- Extensive migration of Control Panel items to Settings app.
- New Power mode settings.
- Bluetooth accessibility settings improvements.
- Wi-Fi 7 support
- File Explorer improvements like tab duplication, a new context menu with labels, the ability to create archives in more formats, etc.
We will discuss all the changes in 24H2 in detail in the next post.
